How To Install Yoast SEO Plugin

Beginners Guide: How To Install Yoast SEO Plugin
In today’s digital world, having a website is essential for any business or individual looking to establish an online presence. However, simply having a website is not enough to guarantee success.
To rank high on search engines like Google, your website must be optimized for search engine optimization (SEO). SEO is the process of improving the visibility and ranking of your website on search engines. This is crucial for driving traffic to your website, which can ultimately lead to increased conversions and sales.
One of the best ways to optimize your website for SEO is by using a plugin. A plugin is a software add-on that extends the functionality of your website. There are many SEO plugins available for WordPress, but one of the most popular and effective is the Yoast SEO plugin.
In this article, we will discuss the importance of SEO and explain what the Yoast SEO plugin is. We will then guide you through the process of installing and configuring the Yoast SEO plugin on your WordPress website. By following these steps, you can improve the SEO of your website and drive more traffic to it.

Importance of SEO for Websites
SEO is essential for the success of any website because it helps improve the visibility and ranking of your website on search engines. When someone searches for keywords related to your website, the search engine will display a list of results. The higher your website ranks on this list, the more likely people are to click on your website and visit it. This can result in increased traffic, conversions, and sales.
Moreover, having a well-optimized website can also help establish your brand as a credible and authoritative source of information in your industry. This can help build trust with potential customers and increase the likelihood of them doing business with you.
Explanation of Yoast SEO Plugin
Yoast SEO is a popular plugin for WordPress that makes it easy to optimize your website for SEO. It offers a range of features that help you analyze your website and make the necessary changes to improve its SEO. Some of the key features of Yoast SEO include:
- Keyword optimization: Yoast SEO helps you optimize your content for specific keywords so that it ranks higher on search engines for those keywords.
- Readability analysis: Yoast SEO analyzes your content for readability and provides suggestions for improving it. This is important because search engines prefer content that is easy to read and understand.
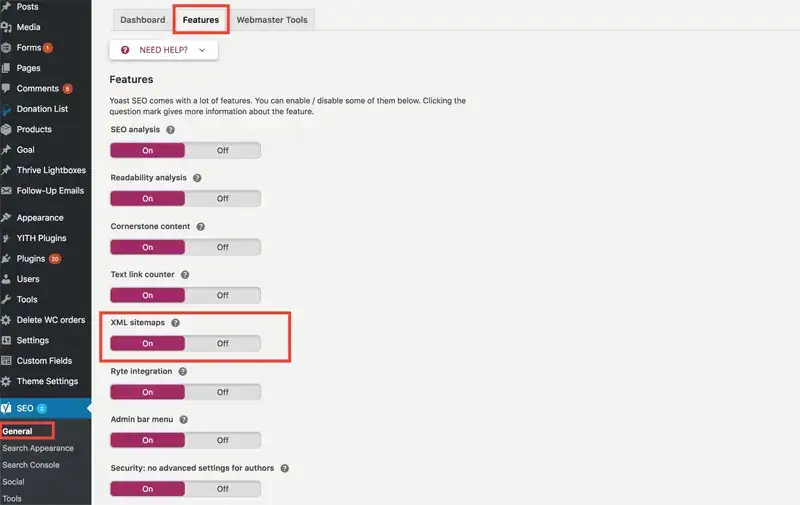
- XML sitemaps: Yoast SEO generates an XML sitemap for your website, which makes it easier for search engines to crawl and index your website.
- Social integration: Yoast SEO integrates with social media platforms, making it easy to share your content on social media and improve the SEO of your website.
- Technical SEO: Yoast SEO helps you optimize your website for technical SEO, which includes things like meta tags, header tags, and more.
By using Yoast SEO, you can improve the SEO of your website and drive more traffic to it.
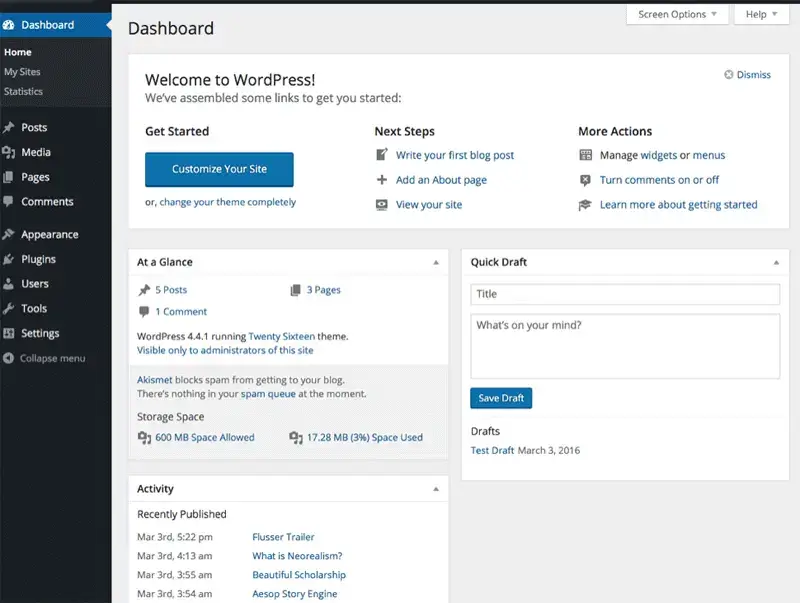
Step 1: Log in to your WordPress Dashboard
The first step in installing the Yoast SEO plugin is to log in to your WordPress dashboard. The WordPress dashboard is where you manage your website, including installing and configuring plugins.
To access the WordPress dashboard, simply go to your website’s URL and add /wp-admin to the end of it (e.g., www.example.com/wp-admin). You will then be prompted to enter your username and password.
It’s important to log in to your WordPress dashboard before installing the Yoast SEO plugin because you need to have the necessary permissions to install and activate plugins on your website.
Step 2: Find the Plugin Section
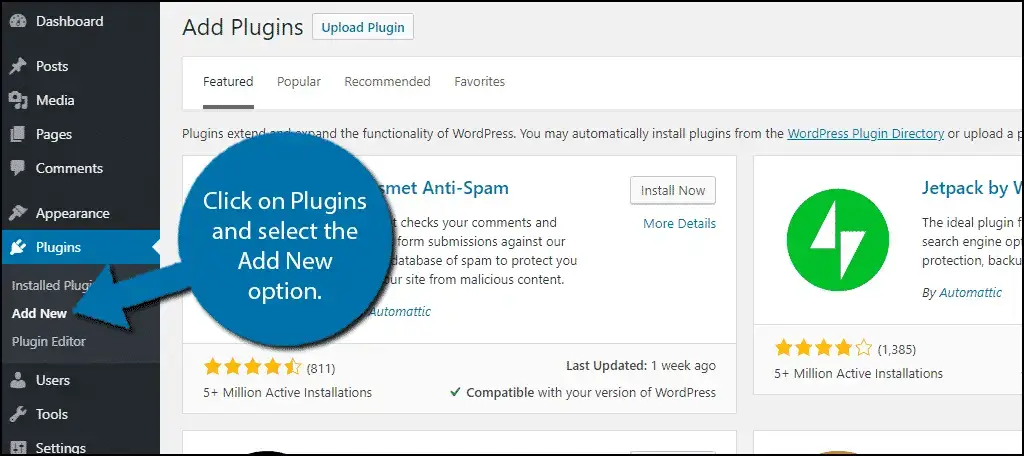
Once you have logged in to your WordPress dashboard, you need to find the plugin section. To do this, simply click on the “Plugins” option in the left-side menu. This will take you to the plugin section of your dashboard, where you can browse, install, and manage the plugins on your website.
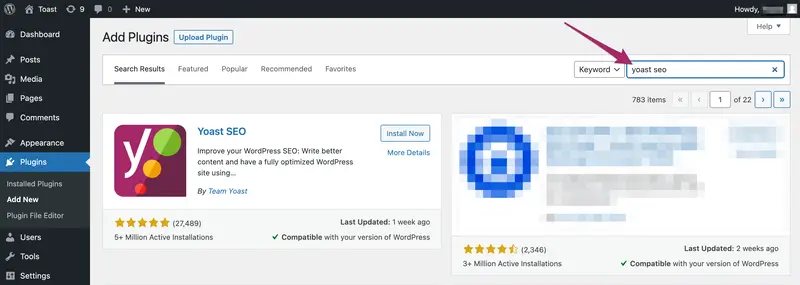
Step 3: Search for Yoast SEO Plugin
Once you are in the plugin section, you can search for the Yoast SEO plugin. To do this, simply type “Yoast SEO” into the search bar at the top of the screen. The Yoast SEO plugin should be the first result. Click on the “Install Now” button to start the installation process.
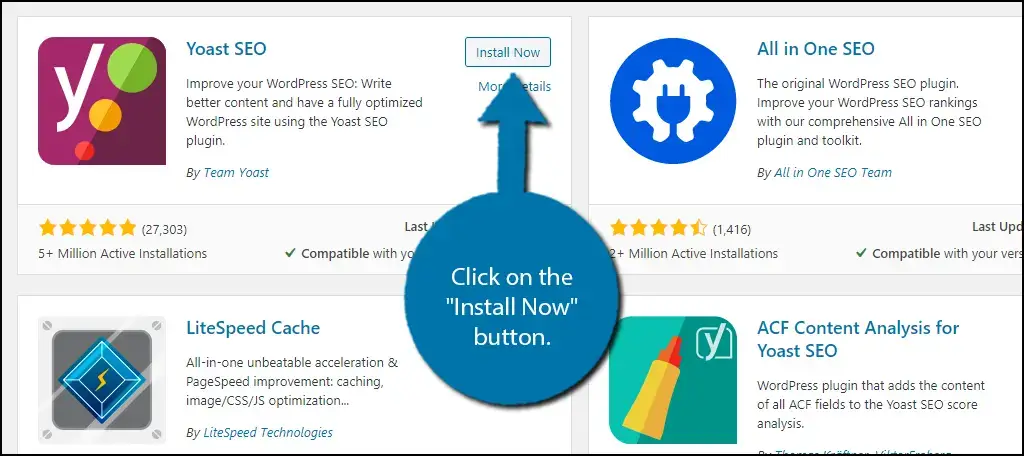
Step 4: Install and Activate Yoast SEO Plugin
Once you have clicked on the “Install Now” button, WordPress will automatically download and install the Yoast SEO plugin. Once the installation is complete, you will see a message saying “Plugin installed successfully.” Click on the “Activate Plugin” button to activate the plugin on your website.
It’s important to activate the plugin after installation because without activation, the plugin will not be functional on your website.
Step 5: Configure the Yoast SEO Settings
Now that you have installed and activated the Yoast SEO plugin, it’s time to configure the settings. To do this, simply click on the “SEO” option in the left-side menu. This will take you to the Yoast SEO settings page, where you can configure the plugin to your liking.

There are many different settings you can configure with Yoast SEO, including:
- General settings: Here you can configure the general settings for your website, such as the title and description for your homepage, and more.
- Titles & Metas: This section allows you to configure the titles and meta descriptions for your website, which are important for SEO.
- Social: This section allows you to configure the social media settings for your website, such as adding your Twitter handle and more.
- XML Sitemaps: This section allows you to configure the XML sitemap for your website, which makes it easier for search engines to crawl and index your website.
- Advanced: This section allows you to configure advanced settings for your website, such as setting the default category for your blog posts, and more.
It’s important to take the time to configure the settings for your website because this will help improve the SEO of your website and drive more traffic to it.
Installing and configuring the Yoast SEO plugin on your WordPress website is a simple and effective way to improve the SEO of your website and drive more traffic to it. By following the steps outlined in this article, you can easily install and configure the Yoast SEO plugin on your website and start improving your website’s SEO.
SEO is crucial for the success of any website and the Yoast SEO plugin is a great tool to help improve the SEO of your website. By following these steps, you can improve the SEO of your website and drive more traffic to it, which can ultimately lead to increased conversions and sales.

Here are some detailed bullet points that summarize the main points of the article:
- Login to WordPress dashboard: To install the Yoast SEO plugin, the first step is to log in to your WordPress dashboard. This can be done by going to your website’s login page and entering your username and password.
- Find the plugin section: Once you have logged in, click on the “Plugins” option in the left-side menu to find the plugin section of your dashboard.
- Search for Yoast SEO plugin: In the plugin section, search for the Yoast SEO plugin by typing “Yoast SEO” into the search bar. The plugin should be the first result and you can click the “Install Now” button to start the installation process.
- Install and activate the plugin: Once you have clicked the “Install Now” button, WordPress will automatically download and install the Yoast SEO plugin. After installation is complete, click the “Activate Plugin” button to make the plugin functional on your website.
- Configure Yoast SEO settings: After activation, click on the “SEO” option in the left-side menu to access the Yoast SEO settings page. Here, you can configure various settings such as general settings, titles & metas, social media settings, XML sitemaps, and advanced settings.
- General settings: In the general settings section, you can configure the title and description for your homepage, among other things.
- Titles & Metas: This section allows you to configure the titles and meta descriptions for your website, which are important for SEO.
- Social: This section allows you to add your Twitter handle and configure other social media settings for your website.
- XML Sitemaps: This section allows you to configure the XML sitemap for your website, making it easier for search engines to crawl and index it.
- Advanced: In the advanced section, you can set the default category for your blog posts, among other things.
- Importance of configuring settings: It’s important to configure the settings for your website because this will help improve your website’s SEO and drive more traffic to it.
Installing and configuring the Yoast SEO plugin on your WordPress website is a simple way to improve your website’s SEO and drive more traffic to it. By following the steps outlined in this article, you can install, activate, and configure the plugin on your website. Improving your website’s SEO is crucial for its success and the Yoast SEO plugin is a great tool to help achieve this.

Action Plan for Installing and Configuring Yoast SEO Plugin on WordPress Website:
1. Log in to WordPress dashboard: Access your website’s login page and enter your username and password to log in to the dashboard.
2. Find the plugin section: Click on the “Plugins” option in the left-side menu to find the plugin section.
3. Search for Yoast SEO plugin: Use the search bar to search for “Yoast SEO” and click the “Install Now” button.
4. Install and activate the plugin: Automatically download and install the Yoast SEO plugin and then click the “Activate Plugin” button.
5. Configure Yoast SEO settings: Click on the “SEO” option in the left-side menu to access the Yoast SEO settings page and configure general, titles & metas, social media, XML sitemaps, and advanced settings.
6. Verify settings: Review and verify the settings that have been configured to ensure they are correct and meet your website’s SEO needs.
7. Continuously monitor and update: Continuously monitor your website’s SEO and update the settings as needed to ensure that it remains optimized and driving traffic to your website.
By following this action plan, you will be able to install and configure the Yoast SEO plugin on your WordPress website in a simple and efficient manner, improving your website’s SEO and driving more traffic to it.
Summary:
The Yoast SEO plugin is a powerful tool for improving your WordPress website’s search engine optimization (SEO) and driving more traffic to it. To install and configure the plugin, you will first need to log in to your WordPress dashboard, find the plugin section, search for the Yoast SEO plugin, install and activate it, and finally, configure the settings. The settings include general, titles & metas, social media, XML sitemaps, and advanced, and they can be reviewed and updated as needed to ensure that your website remains optimized.
Conclusion:
In conclusion, installing and configuring the Yoast SEO plugin on your WordPress website is an essential step for improving your website’s SEO and driving more traffic to it. The plugin is easy to install and configure, and it provides a range of powerful features that help you optimize your website for search engines. By following the steps outlined in this article, you can get started with optimizing your website today and take your online presence to the next level.


![WordPress Classic Editor Explained [Video 8 Of 9]](https://www.wplearning101.com/wp-content/uploads/2022/05/WordPress-Classic-Editor-Explained-Video-8-Of-9-768x432.webp)