How To Activate Google Sitemap With Yoast SEO Plugin

Beginners Guide: How To Activate Google Sitemap With Yoast SEO Plugin
How To Activate Google Sitemap With Yoast SEO WordPress Plugin In WordPress: Having a well-structured website is important for both search engine optimization (SEO) and user experience. One of the ways to ensure a well-structured website is by creating a sitemap.
A sitemap is a file that lists all the pages of a website and helps search engines like Google understand the structure of a website. In this article, we will guide you on how to activate Google Sitemap with the Yoast SEO WordPress plugin in WordPress.
What is Yoast SEO WordPress Plugin?
Yoast SEO is a popular WordPress plugin that helps website owners optimize their website for search engines. The plugin provides a comprehensive set of tools and features that help you improve your website’s visibility and ranking on search engines. Yoast SEO offers a range of features such as keyword optimization, readability analysis, XML sitemap creation, and many more.
Key Features of Yoast SEO
- Keyword optimization: The plugin helps you to optimize your content for specific keywords by analyzing the content’s readability and SEO score.
- Readability analysis: Yoast SEO analyzes your content to ensure it is easily readable for both search engines and users.
- XML sitemap creation: The plugin generates an XML sitemap for your website, which helps search engines understand the structure of your website.
- Social media integration: Yoast SEO helps you to integrate your website with social media platforms, allowing you to share your content easily on social media.
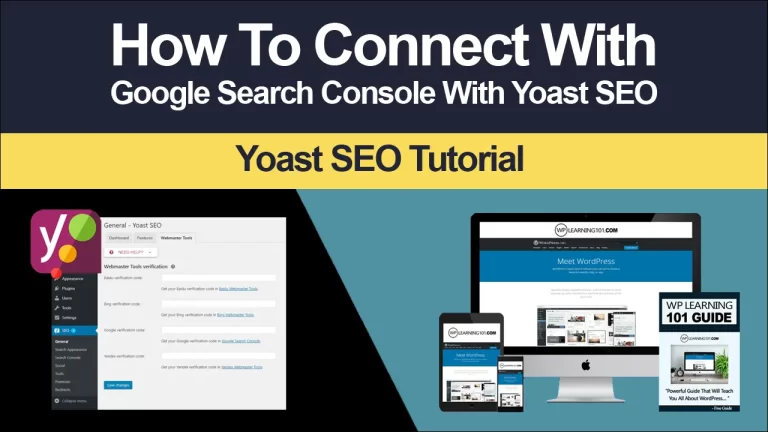
- Google Search Console integration: Yoast SEO integrates with Google Search Console, which helps you to monitor your website’s performance and identify any issues that may affect your website’s ranking.

Benefits of using Yoast SEO for SEO
- Improved search engine ranking: Yoast SEO provides you with the tools and features you need to optimize your website for search engines, helping you to improve your website’s ranking on search engines.
- Better user experience: By analyzing the readability of your content, Yoast SEO helps you to ensure your website provides a good user experience, which is important for both SEO and user engagement.
- Increased website traffic: A well-optimized website will attract more traffic from search engines, leading to increased website traffic and engagement.
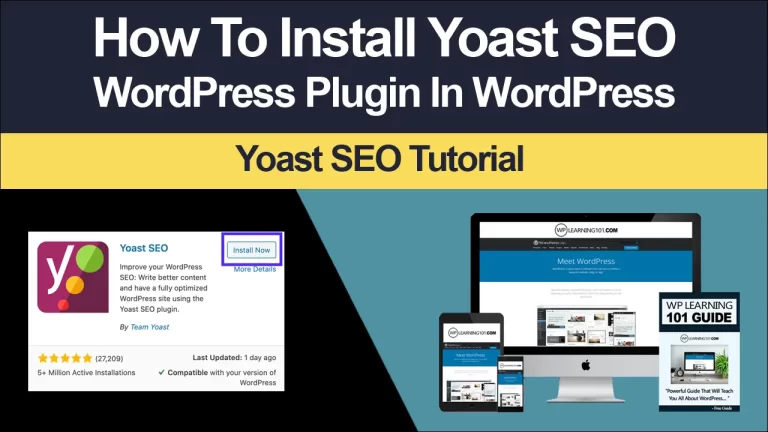
How to Install Yoast SEO WordPress Plugin
Prerequisites
Before you can install Yoast SEO, you will need to have a WordPress website. If you don’t have a WordPress website, you can easily create one by following the steps outlined in the WordPress documentation.
Step-by-step instructions for installation
1. Log in to your WordPress website.
2. Go to the ‘Plugins’ section in the WordPress admin panel.
3. Click on the ‘Add New’ button.
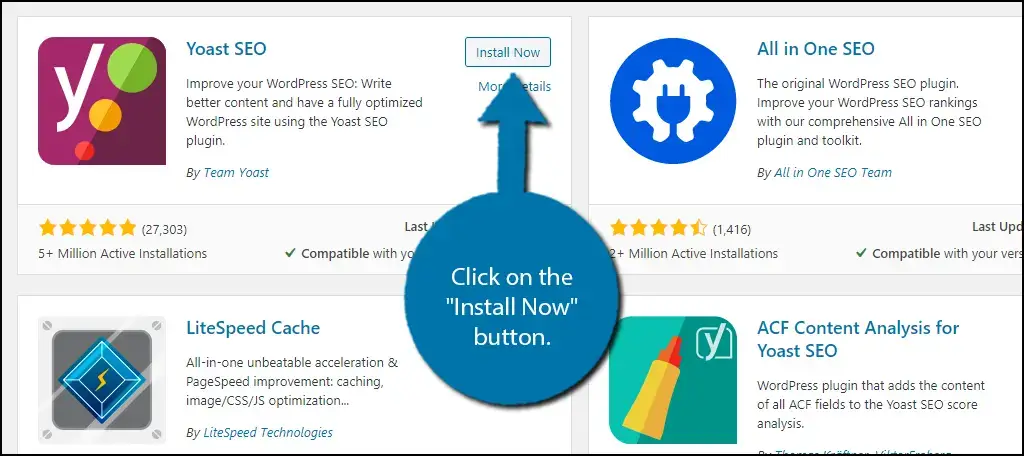
4. Search for ‘Yoast SEO’ in the search bar.
5. Click on the ‘Install Now’ button for the Yoast SEO plugin.
6. After the plugin has been installed, click on the ‘Activate’ button.
How to verify the successful installation
Once you have successfully installed the Yoast SEO plugin, you will see a new ‘SEO’ section in the WordPress admin panel. To verify that the plugin has been installed correctly, you can go to the ‘SEO’ section and check that the plugin is active and configured correctly.
How to Activate Google Sitemap with Yoast SEO WordPress Plugin
Accessing the Yoast SEO Settings
To activate Google Sitemap with the Yoast SEO plugin, you will need to access the Yoast SEO settings in the WordPress admin panel. To do this, follow these steps:
1. Log in to your WordPress website.
2. Go to the ‘SEO’ section in the WordPress admin panel.
3. Click on the ‘General’ tab.
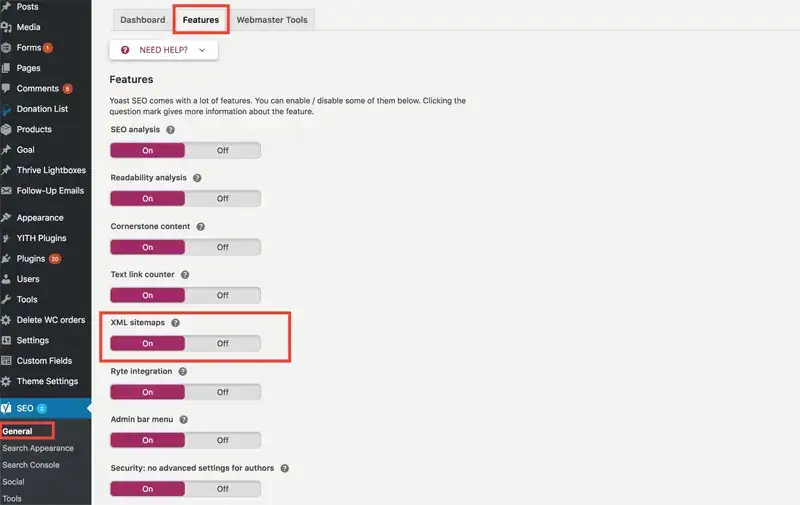
Navigating to the XML Sitemap settings
Once you have accessed the Yoast SEO settings, you will need to navigate to the XML Sitemap settings. To do this, follow these steps:
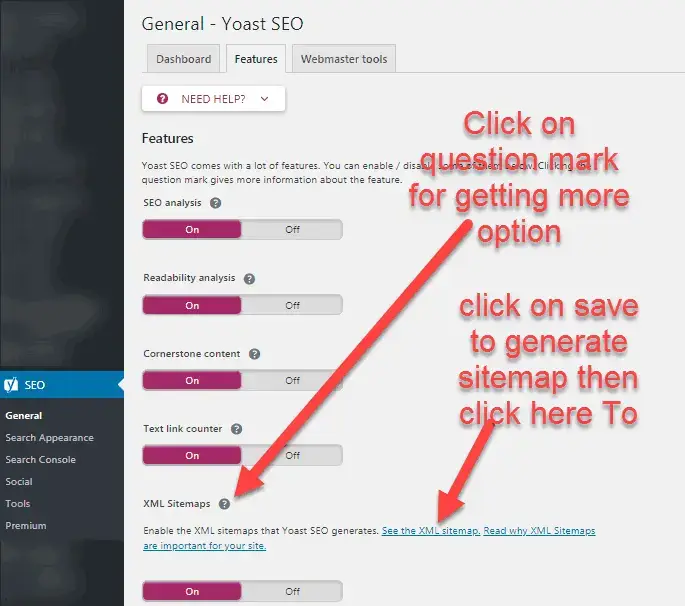
1. In the Yoast SEO settings, click on the ‘Features’ tab.
2. Scroll down to the ‘XML Sitemaps’ section.
3. Make sure the ‘XML sitemaps’ toggle is set to ‘Enabled’.
Activating the Google Sitemap feature
To activate the Google Sitemap feature, you will need to follow these steps:
1. In the XML Sitemap settings, click on the ‘XML Sitemap’ tab.
2. In the ‘XML Sitemap’ tab, make sure the ‘Enable XML sitemap functionality’ toggle is set to ‘Enabled’.
3. Click on the ‘Save changes’ button to save your changes.
Verifying the activation of the Google Sitemap
To verify that the Google Sitemap has been activated, you can go to the XML Sitemap URL. The URL will be in the following format: [your website URL]/sitemap_index.xml. If the Google Sitemap has been activated successfully, you will see an XML file that lists all the pages of your website.
In this article, we have provided a step-by-step guide on how to activate Google Sitemap with the Yoast SEO WordPress plugin in WordPress. By following these steps, you will be able to ensure that your website is well-structured and optimized for search engines. This will help you to improve your website’s ranking on search engines, attract more traffic, and provide a better user experience.
Summary of the steps
1. Install Yoast SEO WordPress plugin.
2. Access the Yoast SEO settings in the WordPress admin panel.
3. Navigate to the XML Sitemap settings.
4. Activate the Google Sitemap feature.
5. Verify the activation of the Google Sitemap.

Benefits of activating Google Sitemap with Yoast SEO
- Improved search engine ranking: By creating a Google Sitemap, you will be helping search engines understand the structure of your website, leading to improved search engine ranking.
- Increased website traffic: A well-structured website that is optimized for search engines will attract more traffic, leading to increased website traffic and engagement.
- Better user experience: By providing a well-structured website, you will be providing a better user experience, which is important for both SEO and user engagement.
Activating Google Sitemap with the Yoast SEO WordPress plugin is an important step towards ensuring that your website is well-structured and optimized for search engines. By following the steps outlined in this article, you will be able to activate Google Sitemap with ease and improve your website’s ranking on search engines.
References:
- Yoast SEO WordPress plugin documentation: https://yoast.com/wordpress/plugins/seo/
- Google Sitemap documentation: https://support.google.com/webmasters/answer/156184?hl=en
- WordPress Codex: https://codex.wordpress.org/
Here are some detailed bullet points that summarize the main points of the article:
- The importance of having a well-structured website for search engines and user experience
- Overview of Google Sitemap and Yoast SEO WordPress plugin
Step 1: Install Yoast SEO WordPress plugin
- Explanation of what Yoast SEO is and its purpose
- How to install the Yoast SEO WordPress plugin through the WordPress plugin repository
Step 2: Access the Yoast SEO settings in the WordPress admin panel
- Log in to your WordPress website
- Go to the ‘SEO’ section in the WordPress admin panel
- Click on the ‘General’ tab
Step 3: Navigate to the XML Sitemap settings
- In the Yoast SEO settings, click on the ‘Features’ tab
- Scroll down to the ‘XML Sitemaps’ section
- Make sure the ‘XML sitemaps’ toggle is set to ‘Enabled’
Step 4: Activate the Google Sitemap feature
- In the XML Sitemap settings, click on the ‘XML Sitemap’ tab
- Make sure the ‘Enable XML sitemap functionality’ toggle is set to ‘Enabled’
- Click on the ‘Save changes’ button
Step 5: Verify the activation of the Google Sitemap
- Go to the XML Sitemap URL (format: [your website URL]/sitemap_index.xml)
- Verify that the XML file lists all the pages of your website
Conclusion
- Summary of the steps for activating Google Sitemap with Yoast SEO
- Benefits of activating Google Sitemap with Yoast SEO
- Final thoughts on the importance of having a well-structured website
Benefits of activating Google Sitemap with Yoast SEO
- Improved search engine ranking
- Increased website traffic
- Better user experience
References
- Yoast SEO WordPress plugin documentation
- Google Sitemap documentation
- WordPress Codex

Action Plan for Activating Google Sitemap with Yoast SEO WordPress Plugin:
1. Install Yoast SEO WordPress plugin:
- Go to the WordPress plugin repository
- Search for ‘Yoast SEO’
- Click on the ‘Install’ button and then on the ‘Activate’ button
2. Access the Yoast SEO settings in the WordPress admin panel:
- Log in to your WordPress website
- Go to the ‘SEO’ section in the WordPress admin panel
- Click on the ‘General’ tab
3. Navigate to the XML Sitemap settings:
- In the Yoast SEO settings, click on the ‘Features’ tab
- Scroll down to the ‘XML Sitemaps’ section
- Make sure the ‘XML sitemaps’ toggle is set to ‘Enabled’
4. Activate the Google Sitemap feature:
- In the XML Sitemap settings, click on the ‘XML Sitemap’ tab
- Make sure the ‘Enable XML sitemap functionality’ toggle is set to ‘Enabled’
- Click on the ‘Save changes’ button
5. Verify the activation of the Google Sitemap:
- Go to the XML Sitemap URL (format: [your website URL]/sitemap_index.xml)
- Verify that the XML file lists all the pages of your website
Note: It is important to regularly check the XML Sitemap to ensure that all the pages of your website are listed and up-to-date.
Summary:
Having a well-structured website is crucial for both search engine optimization and user experience. One way to improve the structure of your website is by activating Google Sitemap. This can be easily achieved by using the Yoast SEO WordPress plugin. The plugin offers a simple and straightforward process for activating the Google Sitemap feature, which can greatly improve your website’s search engine ranking and increase website traffic.
Conclusion:
In conclusion, activating Google Sitemap with Yoast SEO is an important step in ensuring that your website is well-structured and optimized for both search engines and users. The process is easy to follow and can bring significant benefits to your website. It is essential to regularly check your XML Sitemap to make sure all the pages of your website are listed and up-to-date. By following this simple process, you can take your website to the next level and achieve better visibility and engagement with your audience.