
How To Install Sucuri Plugin In WordPress

How To Install & Setup Sucuri
WordPress is a popular content management system (CMS) used by millions of websites around the world. However, as with any website, it’s not immune to security threats and vulnerabilities.
This is where the Sucuri plugin comes in. In this guide, we’ll walk you through the process of installing and setting up the Sucuri plugin on your WordPress site, and show you how to use it to protect your website from various security risks.
1: Introduction to Sucuri plugin for WordPress
- What is the Sucuri plugin for WordPress?
- Why do you need a security plugin for your WordPress site?
- How does Sucuri plugin protect your website?
The Sucuri plugin is a security plugin that helps protect your WordPress site from various security risks, such as malware, hackers, and other threats. It’s a free plugin that you can install on your WordPress site to help keep it secure.
WordPress sites can be vulnerable to a variety of security threats, such as malware, hackers, and other vulnerabilities. These threats can cause damage to your website, steal sensitive information, or even take your website offline. Installing a security plugin like Sucuri can help protect your site and keep it secure.
The Sucuri plugin provides a variety of features to help protect your website, including malware scanning, firewall protection, and security alerts. It also provides a security activity log to help you keep track of any suspicious activity on your website.
2: How to install Sucuri plugin in WordPress
- How to download the Sucuri plugin
- How to install the Sucuri plugin in WordPress
- How to activate the Sucuri plugin
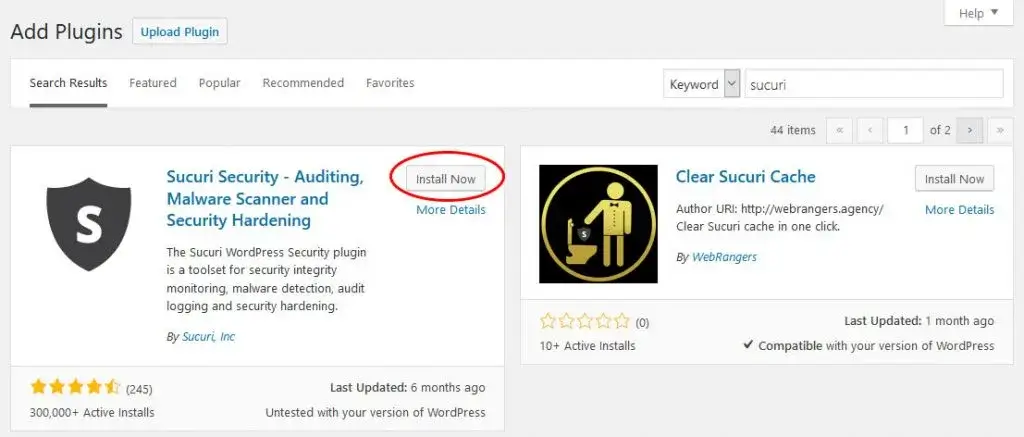
To install the Sucuri plugin on your WordPress site, follow these steps:
- Log in to your WordPress dashboard.
- Go to Plugins > Add New.
- Search for “Sucuri Security” and click on the search result.
- Click on the “Install Now” button.
- After the plugin is installed, click on the “Activate” button.
Once the plugin is activated, you will be prompted to set up your Sucuri account. You can create a free account to get started, or sign in with an existing account if you already have one.
3: How to use Sucuri plugin for malware scanning
- How to run a malware scan with Sucuri plugin
- How to interpret the results of a malware scan
- How to remove malware from your WordPress site
One of the key features of the Sucuri plugin is its malware scanning capabilities. This allows you to scan your website for malware and other security risks. To run a malware scan, follow these steps:
- Log in to your WordPress dashboard.
- Go to Sucuri Security > Malware Scan.
- Click on the “Scan Website” button.
- Wait for the scan to complete.
The scan results will show you if any malware or security risks were found on your website. If malware is found, the plugin will give you instructions on how to remove it.
To remove malware from your website, you can follow the instructions provided by the plugin, or contact Sucuri support for assistance. It’s also a good idea to update all your plugins, theme and WordPress version to the latest version after removing malware.
4: How to use Sucuri plugin for firewall protection
- How to enable firewall protection on your WordPress site
- How to configure firewall settings
- How to interpret firewall logs
Another important feature of the Sucuri plugin is its firewall protection. This feature helps to block malicious traffic from reaching your website, and can also help to prevent hacking attempts and other security risks. To enable firewall protection, follow these steps:
- Log in to your WordPress dashboard.
- Go to Sucuri Security > Firewall.
- Click on the “Enable Firewall” button.
Once the firewall is enabled, you can configure the firewall settings to suit your needs. For example, you can choose which types of traffic to block, and set up custom firewall rules.
You can also view the firewall logs to see a record of all traffic that has been blocked by the firewall. This can help you to understand the types of security risks that your website is facing, and make adjustments to your firewall settings as needed.
5: How to use Sucuri plugin for security alerts
- How to set up security alerts with Sucuri plugin
- How to interpret security alerts
- How to respond to security alerts
The Sucuri plugin also provides security alerts to help you stay informed about any security risks that may affect your website. To set up security alerts, follow these steps:
- Log in to your WordPress dashboard.
- Go to Sucuri Security > Alerts.
- Click on the “Enable Alerts” button.
- Configure the alert settings to your liking.
Once security alerts are enabled, you’ll be notified via email or SMS when any security risks are detected on your website. It’s important to pay attention to these alerts and take action as necessary to address any security issues.
6: How to use Sucuri plugin for security activity log
- How to access the security activity log
- How to interpret the security activity log
- How to use the security activity log to improve website security
The Sucuri plugin also provides a security activity log, which shows a record of all the activity on your website, including login attempts, file changes, and other events. To access the security activity log, follow these steps:
- Log in to your WordPress dashboard.
- Go to Sucuri Security > Activity Log.
The security activity log can be a valuable tool for understanding the types of security risks that your website is facing, and for identifying patterns of suspicious activity. You can use the information in the log to improve the security of your website and to respond more quickly to security incidents.
7: How to use Sucuri plugin for website backups
- How to create backups with Sucuri plugin
- How to restore a website from a backup
- How to schedule backups with Sucuri plugin
The Sucuri plugin also provides a feature for creating backups of your website. This can be a lifesaver in case of any security incidents or other issues that result in data loss. To create a backup, follow these steps:
- Log in to your WordPress dashboard.
- Go to Sucuri Security > Backups.
- Click on the “Create Backup” button.
You can also schedule backups to be created automatically on a regular basis. To set up scheduled backups, follow these steps:
- Log in to your WordPress dashboard.
- Go to Sucuri Security > Backups.
- Click on the “Schedule Backups” button.
- Configure the schedule settings to your liking.
In case of a security incident or other issue that results in data loss, you can restore your website from a backup using the Sucuri plugin. To restore a website from a backup, follow these steps:
- Login to your WordPress dashboard.
- . Go to Sucuri Security > Backups.
- Select the backup that you want to restore from.
- Click on the “Restore” button.
It’s important to note that restoring a website from a backup will overwrite any changes or updates that have been made to your website since the backup was created. Therefore, it’s a good idea to create backups regularly, so that you always have a recent copy of your website that you can restore from in case of an emergency.
8: How to use Sucuri plugin for malware scanning
- How to scan for malware with Sucuri plugin
- How to remove malware using Sucuri plugin
- How to prevent malware infections with Sucuri plugin
The Sucuri plugin also includes a malware scanner that can help you to identify and remove any malware that may have infected your website. To scan for malware, follow these steps:
- Log in to your WordPress dashboard.
- Go to Sucuri Security > Malware Scanner.
- Click on the “Scan Website” button.
If the scanner finds any malware, the Sucuri plugin will provide you with instructions on how to remove it. It’s important to take these steps as soon as possible to prevent the malware from causing any further damage to your website.
To prevent malware infections, it’s a good idea to keep your website software and plugins up to date, and to be careful when installing new software or plugins. The Sucuri plugin also includes a feature that can help to prevent malware infections by blocking known malicious IPs and other suspicious traffic.
9: How to use Sucuri plugin for DDoS protection
- How to enable DDoS protection with Sucuri plugin
- How to configure DDoS protection settings with Sucuri plugin
- How to monitor DDoS attacks with Sucuri plugin
DDoS attacks can be a major problem for websites, as they can cause the website to become unavailable or slow down significantly. The Sucuri plugin includes a feature for protecting your website against DDoS attacks. To enable DDoS protection, follow these steps:
- Log in to your WordPress dashboard.
- Go to Sucuri Security > DDoS Protection.
- Click on the “Enable DDoS Protection” button.
Once the DDoS protection is enabled, you can configure the settings to suit your needs. For example, you can choose which types of traffic to block, and set up custom firewall rules.
You can also view the DDoS protection logs to see a record of all the DDoS attacks that have been blocked by the firewall. This can help you to understand the types of DDoS attacks that your website is facing, and make adjustments to your DDoS protection settings as needed.
10: How to use Sucuri plugin for security hardening
- How to harden the security of your website with Sucuri plugin
- How to use Sucuri plugin to improve the security of your website
- How to use Sucuri plugin to lock down your website
Hardening the security of your website can help to prevent hacking attempts, data breaches, and other security incidents. The Sucuri plugin includes a feature for hardening the security of your website. To harden the security of your website, follow these steps:
- Log in to your WordPress dashboard.
- Go to Sucuri Security > Hardening.
- Click on the “Apply All Hardening Options” button.
Once the hardening options have been applied, your website will be more secure. However, it’s important to note that hardening the security of your website is an on-going process, and you should continue to monitor your website for potential security vulnerabilities and take steps to address them as needed.
One way to improve the security of your website is by regularly running security scans with the Sucuri plugin. This can help to identify any vulnerabilities or malware that may have been missed in the initial hardening process.
You can also use the Sucuri plugin to lock down your website by limiting access to certain areas of your website, such as the admin dashboard. This can help to prevent unauthorized access to sensitive information and prevent hacking attempts.
In addition, the Sucuri plugin includes a feature for monitoring file changes on your website. This can help to detect any unauthorized changes or modifications to your website, such as the addition of malware or backdoors.
Overall, using the Sucuri plugin can significantly improve the security of your WordPress website. By following the steps outlined in this guide, you can take advantage of the various features and tools provided by the plugin to protect your website from various types of security threats, including malware, DDoS attacks, and hacking attempts. Remember, it’s important to keep your website updated, run security scans regularly, and monitor your website for any suspicious activity.
11: How to use Sucuri plugin for monitoring website uptime
- How to enable website uptime monitoring with Sucuri plugin
- How to configure uptime monitoring settings with Sucuri plugin
- How to troubleshoot website downtime with Sucuri plugin
Website uptime is important for ensuring that your website is available to visitors at all times. The Sucuri plugin includes a feature for monitoring your website uptime, which can help you to detect and troubleshoot any issues that may be causing your website to go down. To enable website uptime monitoring, follow these steps:
- Log in to your WordPress dashboard.
- Go to Sucuri Security > Uptime.
- Click on the “Enable Uptime Monitoring” button.
Once the uptime monitoring is enabled, you can configure the settings to suit your needs. For example, you can set the monitoring interval, specify the email address to receive notifications, and configure the uptime threshold.
If your website goes down, the Sucuri plugin will notify you via email. This way, you can quickly identify the cause of the downtime and take steps to resolve the issue. The plugin also has a troubleshoot feature which helps you to quickly identify the cause of the downtime, and also gives you suggestions on how to fix the problem.
12: How to use Sucuri plugin for website performance optimization
- How to optimize website performance with Sucuri plugin
- How to use Sucuri plugin to improve website load times
- How to use Sucuri plugin to reduce server load
Website performance is important for ensuring that your website loads quickly and is responsive to visitors. The Sucuri plugin includes a feature for optimizing website performance, which can help you to improve website load times and reduce server load. To optimize website performance, follow these steps:
- Log in to your WordPress dashboard.
- Go to Sucuri Security > Performance.
- Click on the “Optimize Website” button.
Once you optimize your website, you will be able to see an immediate improvement in your website load times, as well as a decrease in server load. Some of the features that the plugin uses for optimization include minifying and compressing files, caching, and image optimization.
The Sucuri plugin also includes a feature for monitoring your server load, which can help you to identify any issues that may be causing high server load. If high server load is detected, the plugin will give you suggestions on how to reduce it.
Overall, by following the steps outlined in this guide, you can use the Sucuri plugin to improve the performance of your website, increase uptime and overall website security. Remember to keep an eye on your website performance and security regularly to ensure that your website is always running smoothly and securely.

Here are some detailed bullet points that summarize the main points of the article:
- The Sucuri plugin is a security tool for WordPress websites that helps to protect against malware, DDoS attacks, and hacking attempts.
- To install the Sucuri plugin, you can use the WordPress plugin repository or upload the plugin files to your website.
- Once the plugin is installed, you can access its various features and tools through the WordPress dashboard.
- One key feature of the Sucuri plugin is its website hardening tool, which can help to improve the security of your website by implementing various security measures such as disabling file editing, limiting login attempts, and blocking IP addresses.
- Another feature of the Sucuri plugin is its security scanning tool, which can help to identify any vulnerabilities or malware that may have been missed in the initial hardening process.
- The Sucuri plugin also includes a feature for limiting access to certain areas of your website, such as the admin dashboard, which can help to prevent unauthorized access to sensitive information and prevent hacking attempts.
- Another feature is file change monitoring, which can help to detect any unauthorized changes or modifications to your website, such as the addition of malware or backdoors.
- The Sucuri plugin also includes a feature for monitoring website uptime, which can help you to detect and troubleshoot any issues that may be causing your website to go down.
- Lastly, the Sucuri plugin includes a feature for website performance optimization, which can help you to improve website load times and reduce server load.
- To keep your website safe, make sure to keep it updated, run security scans regularly, monitor your website for any suspicious activity, and check website performance regularly.

Here is an action plan that you can use so you know how to install Sucuri plugin in wordpress, based on the information outlined in the article:
1. Install the Sucuri plugin: Use the WordPress plugin repository or upload the plugin files to your website.
2. Configure the plugin: Once the plugin is installed, you can access its various features and tools through the WordPress dashboard.
3. Implement website hardening: Use the website hardening tool to improve the security of your website by implementing various security measures such as disabling file editing, limiting login attempts, and blocking IP addresses.
4. Run security scans: Use the security scanning tool to identify any vulnerabilities or malware that may have been missed in the initial hardening process.
5. Limit access: Use the feature for limiting access to certain areas of your website, such as the admin dashboard, which can help to prevent unauthorized access to sensitive information and prevent hacking attempts.
6. Monitor file changes: Use the feature for file change monitoring, which can help to detect any unauthorized changes or modifications to your website, such as the addition of malware or backdoors.
7. Monitor website uptime: Use the feature for monitoring website uptime, which can help you to detect and troubleshoot any issues that may be causing your website to go down.
8. Optimize website performance: Use the feature for website performance optimization, which can help you to improve website load times and reduce server load.
9. Keep your website updated: Keep your website updated and run security scans regularly to ensure that your website is always running smoothly and securely.
10. Monitor for suspicious activity: Monitor your website for any suspicious activity and check website performance regularly to ensure that your website is always running smoothly and securely.
In summary, the Sucuri plugin is a powerful security tool that can help to protect your WordPress website against malware, DDoS attacks, and hacking attempts. By installing the plugin, you can access its various features and tools, including website hardening, security scanning, limiting access, file change monitoring, website uptime monitoring, and website performance optimization. Implementing these features can help to improve the security of your website, prevent unauthorized access, and optimize website performance.
To keep your website safe, it is important to keep it updated, run security scans regularly, monitor your website for any suspicious activity, and check website performance regularly. By following the action plan outlined in this article and utilizing the features of the Sucuri plugin, you can ensure that your website is running smoothly and securely.
In conclusion, website security is crucial for any online business or personal blog, and the Sucuri plugin is a great option to help you protect your website. It offers a variety of features that can help you to keep your website safe and secure. By following the action plan outlined in this article, you can ensure that your website is always running smoothly and securely. Remember, security is not a one-time thing, it is ongoing process, so make sure to keep an eye on your website and take action when necessary.


![WordPress Gutenberg Editor Quick Overview Of User Interface In WordPress [Video 2 Of 9]](https://www.wplearning101.com/wp-content/uploads/2022/05/WordPress-Gutenberg-Editor-Quick-Overview-Of-User-Interface-In-WordPress-Video-2-Of-9-768x432.webp)