How Do I Resize An Image In WordPress

The Beginner’s Guide to Resizing Images in WordPress
Are you struggling with image sizes on your WordPress website? Do you have trouble uploading images due to their large file sizes or slow loading times? If so, you’re not alone. Image resizing is a crucial aspect of website optimization that can help improve performance, speed, and user experience. In this article, we’ll guide you through the basics of image resizing in WordPress, including why it matters, how to do it, and common issues to avoid. Let’s get started!
Understanding Image Sizes in WordPress
Before we dive into the nitty-gritty of image resizing, let’s take a step back and look at the different image sizes in WordPress. By default, WordPress creates four image sizes when you upload an image: thumbnail, medium, large, and full size.
- Thumbnail: This is a small image size used for thumbnails, galleries, and widgets. The default size is 150px x 150px, but you can change it in the WordPress settings.
- Medium: This size is used for medium-sized images in posts and pages. The default size is 300px x 300px, but you can also adjust it in the WordPress settings.
- Large: This size is used for larger images in posts and pages. The default size is 1024px x 1024px, but you can change it to a different value in the WordPress settings.
- Full Size: This is the original, full-size image that you uploaded. WordPress doesn’t modify this image size, and it’s typically the largest in file size.
It’s important to note that having multiple image sizes can affect your website’s performance and load time. The more image sizes you have, the more server resources are required to generate them. In addition, larger image sizes can increase page load time, especially on mobile devices with slower internet speeds.
How to Resize an Image in WordPress
Now that we understand the different image sizes in WordPress, let’s explore how to resize images in WordPress. There are a few different ways to do this, including using WordPress’s built-in image editor, plugins, and external image editing tools.
Method 1: Using WordPress’s Built-in Image Editor
WordPress’s built-in image editor is a simple and easy way to resize images without leaving the WordPress interface. Here’s how to do it:
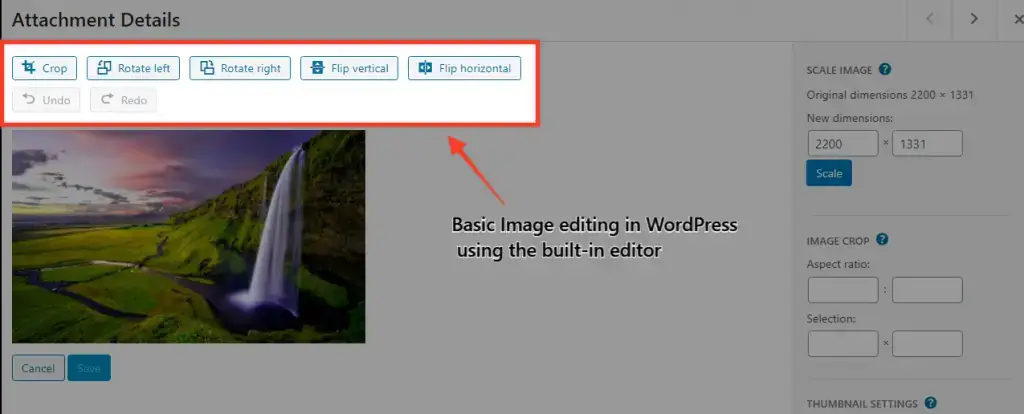
1. Go to your WordPress media library and select the image you want to resize.
2. Click on the “Edit Image” button.
3. In the “Scale Image” section, enter the new width or height of the image in pixels. Make sure to check the “Constraint Proportions” box to preserve the aspect ratio of the image.
4. Click on the “Scale” button to apply the changes.
5. Click on the “Update” button to save the resized image.
This method is best for beginners who are looking for a quick and easy way to resize images. However, keep in mind that this method doesn’t optimize images for web and can result in larger file sizes, which can impact your website’s performance.
Method 2: Using WordPress Plugins To Resize Images
Another way to resize images in WordPress is by using plugins. There are many image resizing plugins available in the WordPress plugin repository, but here are a few of the best ones for beginners:
- Smush: This is a popular image optimization plugin that includes a bulk image resizing feature. With Smush, you can resize all of your images to a specific size and optimize them for web in one click.
- Resize Image After Upload: This is a simple and lightweight plugin that automatically resizes images to a specified maximum width or height after they are uploaded. This plugin is ideal for beginners who want to set a specific image size for all images.
- EWWW Image Optimizer: This plugin offers a range of image optimization features, including resizing, compression, and conversion to different image formats. With this plugin, you can resize images and optimize them for web to improve your website’s performance and speed.
To use a plugin for image resizing, follow these steps:
1. Install and activate the plugin of your choice from the WordPress plugin repository.
2. Go to the plugin settings and select the image size you want to use for your website. Some plugins may offer preset sizes, while others may allow you to set a custom size.
3. Apply the changes and the plugin will automatically resize all images to the selected size.
Plugins are a convenient way to resize images in bulk and optimize them for web. However, keep in mind that some plugins can be resource-intensive and may slow down your website. Make sure to choose a lightweight and well-reviewed plugin for best results.
Method 3: Using External Image Editing Tools
If you have more specific resizing needs or want to optimize images for web, you can use external image editing tools. Some popular tools for image resizing include Adobe Photoshop, GIMP, and Canva. Here’s how to resize an image using an external tool:
1. Open the image editing tool of your choice and upload the image you want to resize.
2. Select the “Resize” or “Image Size” option and enter the new dimensions in pixels.
3. Make sure to preserve the aspect ratio of the image to avoid distortion.
4. Save the resized image to your computer and upload it to your WordPress media library.
External image editing tools offer more flexibility and control over image resizing and optimization. However, they require more time and expertise than the previous methods, and can be more resource-intensive.
Best Image Resizing Plugins for WordPress
As we mentioned earlier, there are many image resizing plugins available in the WordPress plugin repository. To help you choose the best one for your needs, here are some of the best image resizing plugins for WordPress:
1. Smush
Smush is a popular image optimization plugin that includes a bulk image resizing feature. With Smush, you can resize all of your images to a specific size and optimize them for web in one click. Smush can also compress images to reduce their file size and improve website speed. The plugin is easy to use and offers a free version with basic features.
2. Resize Image After Upload
Resize Image After Upload is a simple and lightweight plugin that automatically resizes images to a specified maximum width or height after they are uploaded. This plugin is ideal for beginners who want to set a specific image size for all images. The plugin is free and easy to use, with no configuration required.
3. EWWW Image Optimizer
EWWW Image Optimizer is an image optimization plugin that includes a resizing feature. With this plugin, you can resize images to a specific size and optimize them for web to improve your website’s performance and speed. EWWW Image Optimizer also offers automatic compression and conversion to different image formats. The plugin is free to use for smaller websites and offers a paid version with additional features.
Common Image Resizing Issues and How to Fix Them
While image resizing can improve your website’s performance and user experience, it can also cause some common issues if not done correctly. Here are some common image resizing issues and how to fix them:
1. Pixelation
Pixelation occurs when an image is resized to a larger size than its original resolution. This can result in blurry or distorted images with visible pixels. To avoid pixelation, make sure to resize images proportionally and maintain their aspect ratio. Use a high-quality image editor or plugin to resize images for best results.
2. Distortion
Distortion occurs when an image is resized to an irregular shape, such as a non-uniform width or height. This can result in a stretched or squished image with incorrect proportions. To avoid distortion, make sure to preserve the aspect ratio of the image when resizing it. Most image editors and plugins will automatically preserve the aspect ratio, but make sure to double-check the settings to avoid distortion.
3. Blurriness
Blurriness can occur when an image is resized to a smaller size than its original resolution. This can result in a loss of detail and clarity in the image, which can affect its visual appeal and quality. To avoid blurriness, make sure to use a high-quality image editor or plugin that can resize images without losing quality. You can also try compressing images to reduce their file size while maintaining their quality.
Resizing images in WordPress is an essential aspect of website optimization that can improve your website’s performance, speed, and user experience. By understanding the different image sizes in WordPress, using the right tools and plugins, and avoiding common resizing issues, you can ensure that your images look great and load quickly on your website. Don’t be afraid to experiment with different methods and tools to find the best solution for your needs. We hope this guide has been helpful for beginners looking to resize images in WordPress.
Here are some detailed points that summarize the main points of The Beginner’s Guide to Resizing Images in WordPress:
This article is designed to provide beginners with a comprehensive guide on how to resize images in WordPress. The article covers the basics of image sizes in WordPress and why resizing images is important for website optimization. It then explores different methods for resizing images in WordPress, including using the built-in image editor, plugins, and external image editing tools. The article also includes a list of the best image resizing plugins for WordPress and common issues to avoid when resizing images. Here are the main points covered in the article:
1. Understanding Image Sizes in WordPress: The article begins by explaining the four image sizes in WordPress: thumbnail, medium, large, and full size. It describes how multiple image sizes can affect website performance and load times, particularly on mobile devices with slower internet speeds.
2. How to Resize an Image in WordPress: The article explores three different methods for resizing images in WordPress, including using the built-in image editor, plugins, and external image editing tools. It provides step-by-step instructions for each method and highlights the advantages and disadvantages of each method.
3. Best Image Resizing Plugins for WordPress: The article includes a list of the best image resizing plugins for WordPress, along with their features and benefits. It highlights plugins such as Smush, Resize Image After Upload, and EWWW Image Optimizer, and provides guidance on how to use them to resize images in bulk and optimize them for web.
4. Common Image Resizing Issues and How to Fix Them: The article outlines common image resizing issues such as pixelation, distortion, and blurriness, and provides guidance on how to avoid these issues. It highlights the importance of preserving aspect ratios and using high-quality image editors and plugins to resize images without losing quality.
5. FAQs: The article includes a list of frequently asked questions about image resizing in WordPress, such as the optimal image size, how to compress images without losing quality, and how to optimize images for search engines. It provides clear and concise answers to each question to help readers better understand the topic.
This article provides beginners with a detailed guide on how to resize images in WordPress, including the different methods, tools, and plugins available, as well as common issues and best practices to follow. With this information, beginners can optimize their website’s images for improved performance, speed, and user experience.
Here’s an action plan to help you resize images in WordPress:
1. Identify the image sizes you need: Before you start resizing images, consider the image sizes you need for your website. You can use the default sizes in WordPress or create custom sizes that match your theme and layout. Make sure to choose sizes that balance image quality with website performance and load times.
2. Choose the method that works best for you: There are several methods for resizing images in WordPress, including using the built-in image editor, plugins, and external image editing tools. Choose the method that works best for your skill level, time, and budget. If you’re a beginner, the built-in image editor or plugins may be the best option.
3. Use an image resizing plugin: If you have many images to resize, consider using an image resizing plugin like Smush or EWWW Image Optimizer. These plugins can resize all of your images in bulk and optimize them for web to improve your website’s performance and speed. Be sure to choose a lightweight and well-reviewed plugin to avoid any performance issues.
4. Optimize images for web: When resizing images, it’s important to optimize them for web to reduce file size and improve load times. You can use image compression plugins like Smush or EWWW Image Optimizer to compress images without losing quality. You can also choose the right file format for your images, such as JPEG or PNG, based on their type and use case.
5. Avoid common image resizing issues: To avoid common image resizing issues like pixelation, distortion, and blurriness, make sure to use a high-quality image editor or plugin that can resize images without losing quality. Preserve the aspect ratio of the image when resizing it to avoid distortion. Check the image quality before and after resizing it to avoid blurriness or pixelation.
By following these steps, you can resize images in WordPress effectively and optimize them for web to improve your website’s performance and user experience.
Here are frequently asked questions about resizing images in WordPress
Q: What is the optimal size for images in WordPress?
A: The optimal image size in WordPress depends on the theme and layout of your website. Generally, you should aim for a maximum width of 1200px and a file size of less than 100KB to ensure fast loading times.
Q: How can I compress images in WordPress without losing quality?
A: You can use image compression plugins like Smush or EWWW Image Optimizer to compress images without losing quality. These plugins use advanced compression algorithms to reduce the file size of images while maintaining their visual quality.
Q: Can I resize images in bulk in WordPress?
A: Yes, you can use image resizing plugins like Smush or EWWW Image Optimizer to resize images in bulk. These plugins can resize all images on your website to a specific size and optimize them for web in one click.
Q: What file format should I use for resized images in WordPress?
A: The recommended file format for resized images in WordPress is JPEG or PNG. JPEG is ideal for photographs and images with lots of colors, while PNG is ideal for images with transparency or a limited color palette.
Q: How can I optimize images for search engines in WordPress?
A: You can optimize images for search engines in WordPress by using descriptive file names, alt text, and captions. Make sure to use relevant keywords and phrases in your image metadata to improve its visibility and relevance.
Q: What are the benefits of using image resizing plugins in WordPress?
A: Image resizing plugins in WordPress can help automate the process of resizing images and optimize them for web. They can also save you time and effort by resizing images in bulk and reducing their file size.
Q: Can I restore an original image after resizing it in WordPress?
A: No, once an image has been resized in WordPress, the original version is lost. It’s a good idea to keep a backup of your original images to avoid losing them in the resizing process.
Conclusion
In summary, resizing images in WordPress is an essential aspect of website optimization that can improve your website’s performance, speed, and user experience. This beginner’s guide has covered the basics of image sizes in WordPress, explored different methods for resizing images, provided a list of the best image resizing plugins for WordPress, and outlined common issues to avoid when resizing images.
By understanding the different image sizes in WordPress, using the right tools and plugins, and avoiding common resizing issues, you can ensure that your images look great and load quickly on your website. The article also includes frequently asked questions to provide clear and concise answers to readers’ concerns.
In conclusion, the article provides comprehensive guidance for beginners looking to resize images in WordPress. By following the steps outlined in this article, beginners can optimize their website’s images for improved performance, speed, and user experience. By choosing the right image size, method, and tools, and avoiding common resizing issues, beginners can ensure that their website’s images look great and load quickly, making their website more appealing to visitors.


![WordPress Classic Editor Explained [Video 8 Of 9]](https://www.wplearning101.com/wp-content/uploads/2022/05/WordPress-Classic-Editor-Explained-Video-8-Of-9-768x432.webp)