How do I Create A WordPress Membership Site With Ultimate Member
Beginners Guide: How do I Create A WordPress Membership Site With Ultimate Member
A WordPress membership site is a website that restricts access to certain content to only paying members. The content can be anything from premium articles, videos, podcasts, courses, and more. Having a membership site allows you to monetize your online content and build a community of engaged users who are interested in what you have to offer.
The Ultimate Member plugin is one of the most popular membership plugins for WordPress. It provides a simple and easy-to-use solution for creating a membership site, even for those with little to no technical experience. In this article, we will walk you through the steps of creating a WordPress membership site with Ultimate Member.

What is Ultimate Member?
Ultimate Member is a powerful and flexible membership plugin for WordPress that allows you to create, manage, and monetize your membership site. It comes with a range of features that make it easy to build and customize your site, including:
- User registration and login
- Custom user roles and permissions
- Custom user profiles
- Member directories
- Content restriction
- Monetization options, including membership levels and recurring payments
One of the key benefits of Ultimate Member is its ease of use. Unlike other membership plugins that require you to have a good understanding of coding and technical skills, Ultimate Member is designed to be user-friendly, even for those with no technical experience.
Setting up Ultimate Member
The first step to creating a WordPress membership site with Ultimate Member is to install the plugin. To do this, follow these steps:
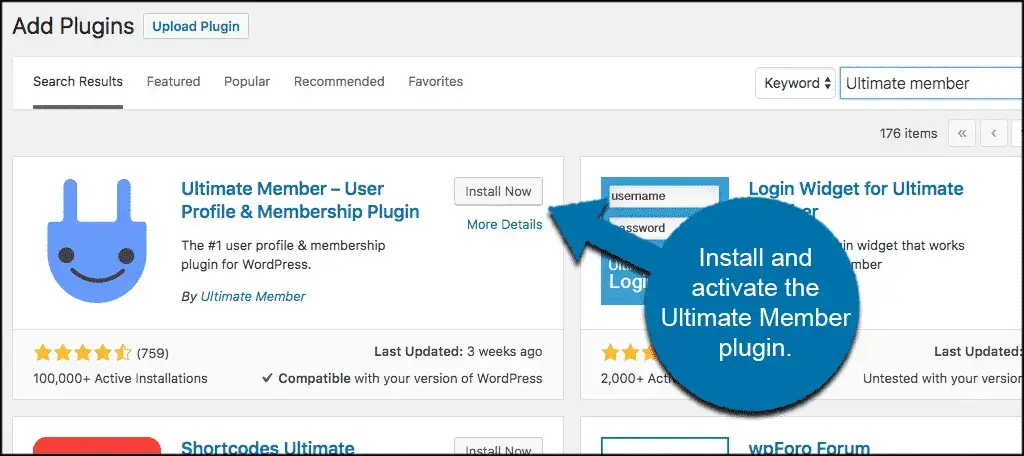
1. Log in to your WordPress dashboard
2. Go to the Plugins section and click on Add New
3. Search for Ultimate Member and click on Install Now
4. Once the plugin is installed, click on Activate
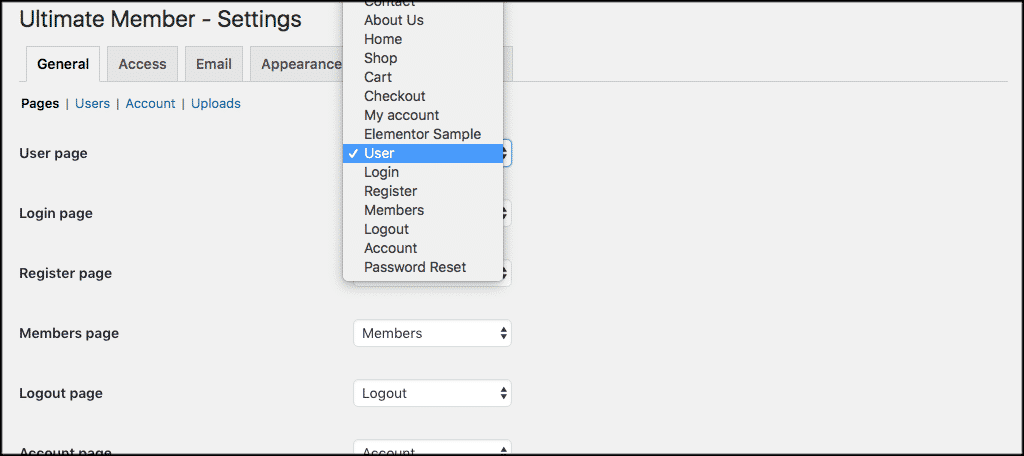
Once you have installed the plugin, the next step is to configure the basic settings. To do this, follow these steps:
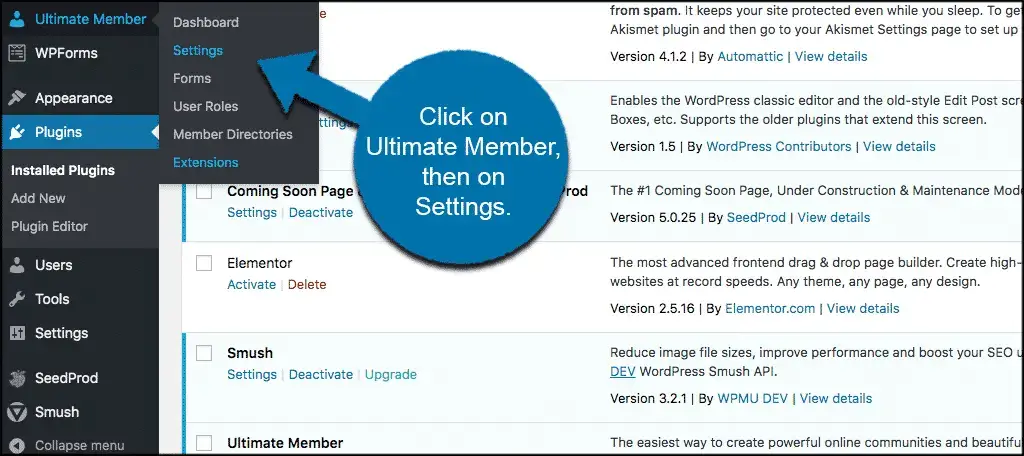
1. Go to Ultimate Member > Settings
2. Configure the general settings, including the login and registration pages, and the email settings.
3. Save your changes.
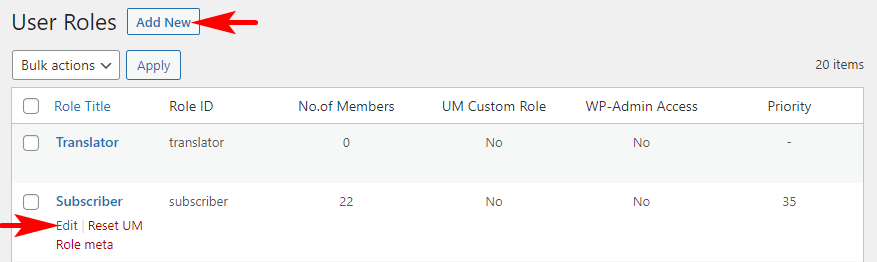
The next step is to create user roles. User roles determine what actions users can perform on your site. For example, you may want to create a role for members and a role for moderators. To create user roles, follow these steps:
1. Go to Ultimate Member > User Roles
2. Click on Add New
3. Enter the name of the role and configure the permissions.
4. Save your changes.

Designing Your Membership Site With Ultimate Member
Once you have set up the basic settings, the next step is to design your membership site. This includes customizing the registration form, creating custom user profiles, and setting up member directories.
Customizing the registration form is an important step as it allows you to collect information from users when they sign up. To customize the registration form, follow these steps:
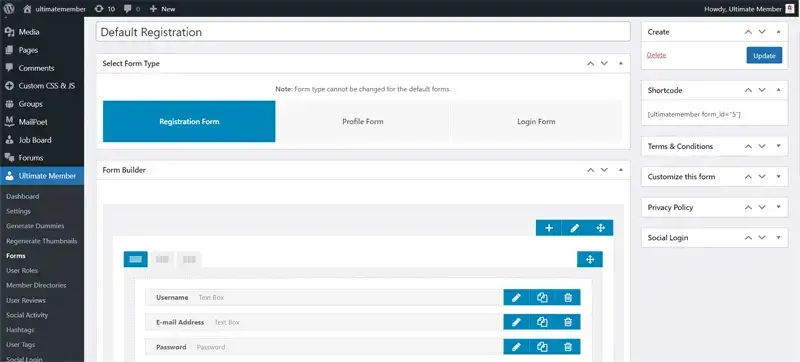
1. Go to Ultimate Member > Forms
2. Click on Add New
3. Select the Registration form type
4. Customize the form fields, including the name, email, password, and any additional fields you want to collect.
5. Save your changes.
Custom user profiles are a great way to showcase your members and build a sense of community on your site. To create custom user profiles, follow these steps:
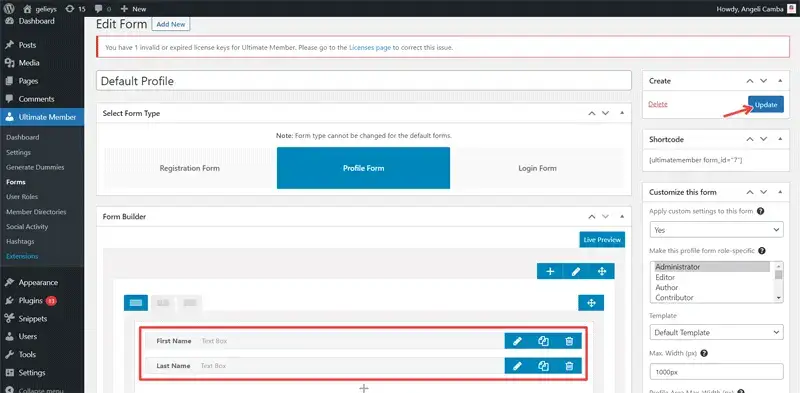
1. Go to Ultimate Member > User Roles
2. Click on the Edit link for the role you want to edit
3. Scroll down to the Profile Fields section
4. Add any additional fields you want to display on the user profile.
5. Save your changes.
Member directories allow you to showcase your members on your site. To set up member directories, follow these steps:
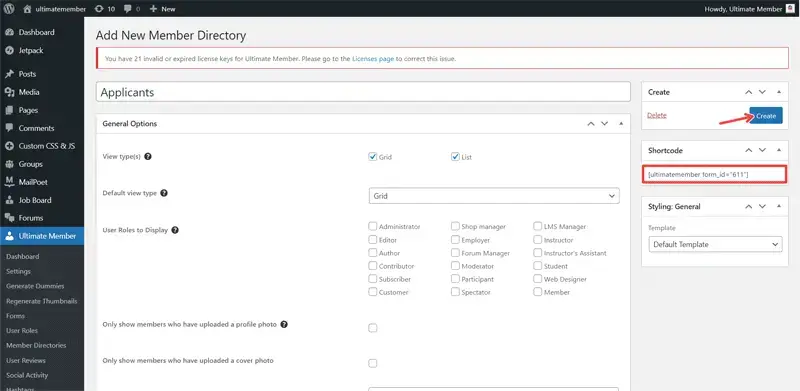
1. Go to Ultimate Member > User Directories
2. Click on Add New
3. Configure the directory settings, including the layout, sorting options, and the fields to display.
4. Save your changes.
Monetizing Your Membership Site
Once you have set up your membership site, the next step is to monetize it. This includes setting up membership levels and pricing, integrating with payment gateways, and managing recurring payments.

To set up membership levels and pricing, follow these steps:
1. Go to Ultimate Member > Membership Levels
2. Click on Add New
3. Enter the name of the level and configure the pricing and duration.
4. Save your changes.
Integrating with payment gateways, such as PayPal or Stripe, allows you to accept payments from your members. To integrate with a payment gateway, follow these steps:
1. Go to Ultimate Member > Payment Gateways
2. Select the payment gateway you want to use and configure the settings.
3. Save your changes.
Managing recurring payments is important for ensuring that members continue to have access to your content. To manage recurring payments, follow these steps:
1. Go to Ultimate Member > Payment Transactions
2. View the list of transactions and manage the recurring payments.
Adding Content to Your Site
Once you have monetized your site, the next step is to add content. This includes creating protected content, setting up dripped content, and adding forums and community features.
Protected content is content that is only accessible to members. To create protected content, follow these steps:
1. Create a new post or page in WordPress
2. Scroll down to the Ultimate Member – Restrict Content section
3. Select the membership level required to access the content
4. Publish the post or page.
Dripped content is content that is released over time, rather than all at once. To set up dripped content, follow these steps:
- Go to Ultimate Member > Content Dripping
- Click on Add New
- Configure the settings, including the content, the membership level, and the schedule.
- Save your changes.
Forums and community features are a great way to build engagement and foster a sense of community on your site. Ultimate Member integrates with popular forum plugins, such as bbPress and BuddyPress, to allow you to add these features to your site.
Managing Your Members
The final step in creating a WordPress membership site with Ultimate Member is to manage your members. This includes approving or rejecting membership requests, managing member profiles, and sending email notifications.
To approve or reject membership requests, follow these steps:
1. Go to Ultimate Member > Members
2. View the list of members and approve or reject their membership requests.
Managing member profiles allows you to view and edit the information for each member. To manage member profiles, follow these steps:
1. Go to Ultimate Member > Members
2. Click on the Edit link for the member you want to edit
3. View and edit the member’s information.
Sending email notifications allows you to communicate with your members and keep them informed about important updates and news. To send email notifications, follow these steps:
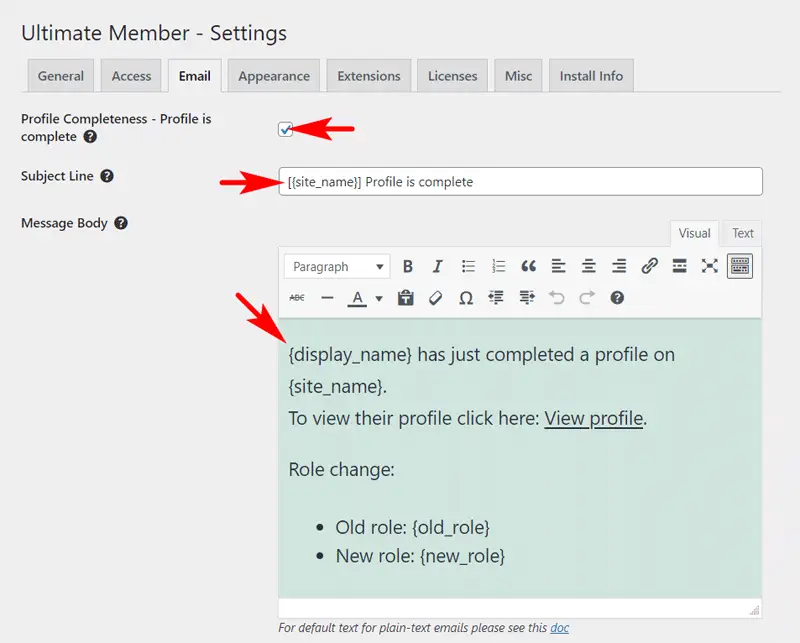
1. Go to Ultimate Member > Emails
2. Click on Add New
3. Configure the email settings, including the recipient, subject, and message.
4. Save your changes.
Creating a WordPress membership site with Ultimate Member is a straightforward process that can be completed in just a few steps. By following the steps outlined in this article, you can quickly and easily create a membership site that allows you to monetize your content and build a community of engaged users.
Whether you’re a blogger, content creator, or entrepreneur, a membership site is a great way to generate revenue and build a loyal following. With Ultimate Member, you have all the tools you need to create a professional and functional membership site that meets your specific needs and goals.
If you’re looking for a simple and effective way to create a membership site, Ultimate Member is definitely worth considering. With its user-friendly interface and powerful features, you can have your site up and running in no time. So, why not get started today and start building your own membership site!
Here are some detailed bullet points that summarize the main points of the article:
- Definition of a WordPress membership site: a website that restricts access to certain content to only paying members.
- Importance of having a membership site: monetize online content and build a community of engaged users.
- Overview of Ultimate Member plugin: a popular and easy-to-use membership plugin for WordPress.
What is Ultimate Member?
- Features: user registration and login, custom user roles and permissions, custom user profiles, member directories, content restriction, monetization options.
- Ease of use: designed to be user-friendly even for those with no technical experience.
Setting up Ultimate Member:
- Installing the plugin: via the WordPress dashboard, search for Ultimate Member, install and activate the plugin.
- Configuring basic settings: in the Ultimate Member > Settings section, set up the general settings, including the login and registration pages and email settings.
- Creating user roles: in the Ultimate Member > User Roles section, add new roles and configure the permissions.
Designing Your Membership Site:
- Customizing the registration form: in the Ultimate Member > Forms section, add a new registration form, customize the form fields, and save changes.
- Creating custom user profiles: in the Ultimate Member > User Roles section, edit the role and add additional fields to display on the user profile.
- Setting up member directories: in the Ultimate Member > User Directories section, add a new directory, configure the settings, and save changes.
Monetizing Your Membership Site:
- Setting up membership levels and pricing: in the Ultimate Member > Membership Levels section, add new levels, configure the pricing and duration, and save changes.
- Integrating with payment gateways: in the Ultimate Member > Payment Gateways section, select the payment gateway to use and configure the settings.
- Managing recurring payments: in the Ultimate Member > Payment Transactions section, view and manage recurring payments.
Adding Content to Your Site:
- Creating protected content: in a new post or page in WordPress, add the membership level required to access the content in the Ultimate Member – Restrict Content section.
- Setting up dripped content: in the Ultimate Member > Content Dripping section, add new content dripping, configure the settings, and save changes.
- Adding forums and community features: Ultimate Member integrates with popular forum plugins, such as bbPress and BuddyPress, to add these features to your site.
Managing Your Members:
- Approving or rejecting membership requests: in the Ultimate Member > Members section, view the list of members, approve or reject their membership requests.
- Managing member profiles: in the Ultimate Member > Members section, edit the member’s information.
- Sending email notifications: in the Ultimate Member > Emails section, add new emails, configure the settings, and save changes.
Conclusion:
- Creating a WordPress membership site with Ultimate Member is a straightforward process with powerful features and user-friendly interface.
- A membership site is a great way to generate revenue and build a loyal following.
- Ultimate Member provides all the tools needed to create a professional and functional membership site.
- Consider using Ultimate Member for a simple and effective way to create a membership site.
Action Plan for Creating a WordPress Membership Site with Ultimate Member:
1. Install the Ultimate Member plugin:
- Log in to your WordPress dashboard
- Go to the Plugins section and click on Add New
- Search for Ultimate Member and click on Install Now
- Once the plugin is installed, click on Activate
2. Configure basic settings:
- Go to Ultimate Member > Settings
- Configure the general settings, including the login and registration pages, and the email settings.
- Save your changes.
3. Create user roles:
- Go to Ultimate Member > User Roles
- Click on Add New
- Enter the name of the role and configure the permissions.
- Save your changes.
4. Customize the registration form:
- Go to Ultimate Member > Forms
- Click on Add New
- Select the Registration form type
- Customize the form fields, including the name, email, password, and any additional fields you want to collect.
- Save your changes.
5. Create custom user profiles:
- Go to Ultimate Member > User Roles
- Click on the Edit link for the role you want to edit
- Scroll down to the Profile Fields section
- Add any additional fields you want to display on the user profile.
- Save your changes.
6. Set up member directories:
- Go to Ultimate Member > User Directories
- Click on Add New
- Configure the directory settings, including the layout, sorting options, and the fields to display.
- Save your changes.
7. Set up membership levels and pricing:
- Go to Ultimate Member > Membership Levels
- Click on Add New
- Enter the name of the level and configure the pricing and duration.
- Save your changes.
8. Integrate with payment gateways:
- Go to Ultimate Member > Payment Gateways
- Select the payment gateway you want to use and configure the settings.
- Save your changes.
9. Manage recurring payments:
- Go to Ultimate Member > Payment Transactions
- View the list of transactions and manage the recurring payments.
10. Create protected content:
- Create a new post or page in WordPress
- Scroll down to the Ultimate Member – Restrict Content section
- Select the membership level required to access the content
- Publish the post or page.
11. Set up dripped content:
- Go to Ultimate Member > Content Dripping
- Click on Add New
- Configure the settings, including the content, the membership level, and the schedule.
- Save your changes.
12. Add forums and community features:
- Ultimate Member integrates with popular forum plugins, such as bbPress and BuddyPress, to add these features to your site.
13. Approve or reject membership requests:
- Go to Ultimate Member > Members
- View the list of members and approve or reject their membership requests.
14. Manage member profiles:
- Go to Ultimate Member > Members
- Click on the Edit link for the member you want to edit
- View and edit the member’s information.
15. Send email notifications:
- Go to Ultimate Member > Emails
- Click on Add New
- Configure the email settings, including the recipient, subject, and message.
- Save your changes.
By following these steps, you will have a successful WordPress membership site up and running with Ultimate Member.
Summary:
Creating a WordPress membership site with Ultimate Member is a simple and effective solution for monetizing online content and building a community of engaged users. The Ultimate Member plugin offers a range of powerful features, including user registration and login, custom user roles and permissions, custom user profiles, member directories, content restriction, and monetization options.
The plugin is designed to be user-friendly and requires no technical experience to set up and manage.
Conclusion:
In conclusion, Ultimate Member is a great choice for those looking to create a membership site on WordPress. With its user-friendly interface and powerful features, you can easily set up and manage a professional and functional membership site that meets your specific needs and goals.
Whether you’re a blogger, content creator, or entrepreneur, a membership site is a great way to generate revenue and build a loyal following. So, why not get started today and create your own WordPress membership site with Ultimate Member!